
RPC是什么
在很久之前的单机时代,一台电脑中跑着多个进程,进程之间没有交流各干各的,就这样过了很多年。突然有一天有了新需求,A进程需要实现一个画图的功能,恰好邻居B进程已经有了这个功能,偷懒的程序员C想出了一个办法:A进程调B进程的画图功能。于是出现了IPC(Inter-process communication,进程间通信)。就这样程序员C愉快的去吃早餐去了!
又过了几年,到了互联网时代,每个电脑都实现了互联互通。这时候雇主又有了新需求,当时还没挂的A进程需要实现使用tensorflow识别出笑脸 >_< 。说巧不巧,远在几千里的一台快速运行的电脑上已经实现了这个功能,睡眼惺忪的程序媛D接手了这个A进程后借鉴之前IPC的实现,把IPC扩展到了互联网上,这就是RPC(Remote Procedure Call,远程过程调用)。RPC其实就是一台电脑上的进程调用另外一台电脑上的进程的工具。成熟的RPC方案大多数会具备服务注册、服务发现、熔断降级和限流等机制。目前市面上的RPC已经有很多成熟的了,比如Facebook家的Thrift、Google家的gRPC、阿里家的Dubbo和蚂蚁家的SOFA。
接口定义语言
接口定义语言,简称IDL,是实现端对端之间可靠通讯的一套编码方案。这里有涉及到传输数据的序列化和反序列化,我们常用的http的请求一般用json当做序列化工具,定制rpc协议的时候因为要求响应迅速等特点,所以大多数会定义一套序列化协议。比如:
Protobuf:
1 | // protobuf 版本 |
讲到Protobuf就得讲到该库作者的另一个作品Cap'n proto了,号称性能是直接秒杀Google Protobuf,直接上官方对比:
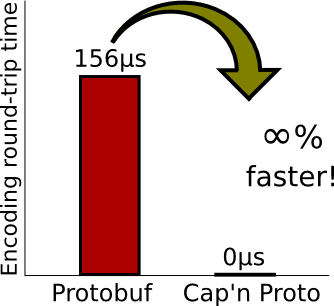
虽然知道很多比Protobuf更快的编码方案,但是快到这种地步也是厉害了,为啥这么快,Cap’n Proto的文档里面就立刻说明了,因为Cap'n Proto没有任何序列号和反序列化步骤,Cap'n Proto编码的数据格式跟在内存里面的布局是一致的,所以可以直接将编码好的structure直接字节存放到硬盘上面。贴个栗子:
1 | @0xdbb9ad1f14bf0b36; # unique file ID, generated by `capnp id` |
我们这里要定制的编码方案就是基于protobuf和Cap'n Proto结合的类似的语法。因为本人比较喜欢刀剑神域里的男主角,所以就给这个库起了个名字 —— Kiritobuf。
首先我们定义kirito的语法:
1 | # test |
#开头的是注释- 保留关键字,
service、method、struct, {}里是一个块结构()里有两个参数,第一个是请求的参数结构,第二个是返回值的结构@是定义参数位置的描述符,0表示在首位=号左边是参数名,右边是参数类型
参数类型:
- Boolean:
Bool - Integers:
Int8,Int16,Int32,Int64 - Unsigned integers:
UInt8,UInt16,UInt32,UInt64 - Floating-point:
Float32,Float64 - Blobs:
Text,Data - Lists:
List(T)
定义好了语法和参数类型,我们先过一下生成有抽象关系代码的流程:
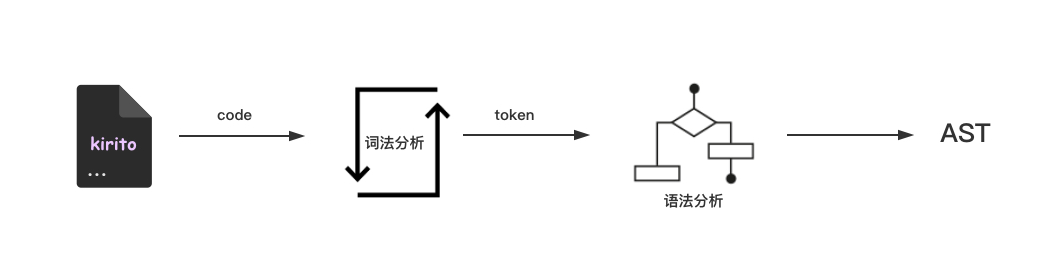
取到.kirito后缀的文件,读取全部字符,通过词法分析器生成token,得到的token传入语法分析器生成AST (抽象语法树)。
首先我们新建一个kirito.js文件:
1 | ; |
定义好了一些必要的字面量,接下来首先是词法分析阶段。
词法解析
我们设计词法分析得到的Token是这样子的:
1 | [ { type: 'keyword', value: 'service' }, |
词法分析步骤:
- 把获取到的
kirito代码串按照\n分割组合成数组A,数组的每个元素就是一行代码 - 遍历数组A,将每行代码逐个字符去读取
- 在读取的过程中定义匹配规则,比如注释、保留字、变量、符号、数组等
- 将每个匹配的字符或字符串按照对应类型添加到tokens数组中
代码如下:
1 | [tokenizer] (input) { |
语法分析
得到上面的词法分析的token后,我们就可以对该token做语法分析,我们需要最终生成的AST的格式如下:
1 | { |
看上图我们能友好的得到结构、参数、数据类型、函数之间的依赖和关系,步骤:
- 遍历词法分析得到的token数组,通过调用分析函数提取token之间的依赖节点
- 分析函数内部定义token提取规则,比如:
- 服务保留字 服务名 { 函数保留字 函数名 ( 入参,返回参数 ) }
- 参数结构保留字 结构名 { 参数位置 参数名 参数数据类型 }
- 递归调用分析函数提取对应节点依赖关系,将节点添加到AST中
代码如下:
1 | [parser] (tokens) { |
转换器
得到了语法分析的AST后我们需要进一步对AST转换为更易操作的js对象。格式如下:
1 | { |
通过上面这个格式,我们可以更容易的知道有几个service、service里有多少个函数以及函数的参数。
代码如下:
1 | // 转换器 |
传输协议
RPC协议有多种,可以是json、xml、http2,相对于http1.x这种文本协议,http2.0这种二进制协议更适合作为RPC的应用层通信协议。很多成熟的RPC框架一般都会定制自己的协议已满足各种变化莫测的需求。
比如Thrift的TBinaryProtocol、TCompactProtocol等,用户可以自主选择适合自己的传输协议。
大多数计算机都是以字节编址的(除了按字节编址还有按字编址和按位编址),我们这里只讨论字节编址。每个机器因为不同的系统或者不同的CPU对内存地址的编码有不一样的规则,一般分为两种字节序:大端序和小端序。
大端序: 数据的高字节保存在低地址
小端序: 数据的低字节保存在高地址
举个栗子:
比如一个整数:258,用16进制表示为0x0102,我们把它分为两个字节0x01和ox02,对应的二进制为0000 0001和0000 0010。在大端序的电脑上存放形式如下:

小端序则相反。为了保证在不同机器之间传输的数据是一样的,开发一个通讯协议时会首先约定好使用一种作为通讯方案。java虚拟机采用的是大端序。在机器上我们称为主机字节序,网络传输时我们称为网络字节序。网络字节序是TCP/IP中规定好的一种数据表示格式,它与具体的CPU类型、操作系统等无关,从而可以保证数据在不同主机之间传输时能够被正确解释。网络字节序采用大端排序方式。
我们这里就不造新应用层协议的轮子了,我们直接使用MQTT协议作为我们的默认应用层协议。MQTT(Message Queuing Telemetry Transport,消息队列遥测传输协议),是一种基于发布/订阅(publish/subscribe)模式的“轻量级”通讯协议,采用大端序的网络字节序传输,该协议构建于TCP/IP协议上。
实现通讯
先贴下实现完的代码调用流程,首先是server端:
1 | ; |
client端:
1 | ; |
无论是server端定义函数或者client端调用函数都是比较简洁的步骤。接下来我们慢慢剖析具体的逻辑实现。
贴下具体的调用流程架构图:
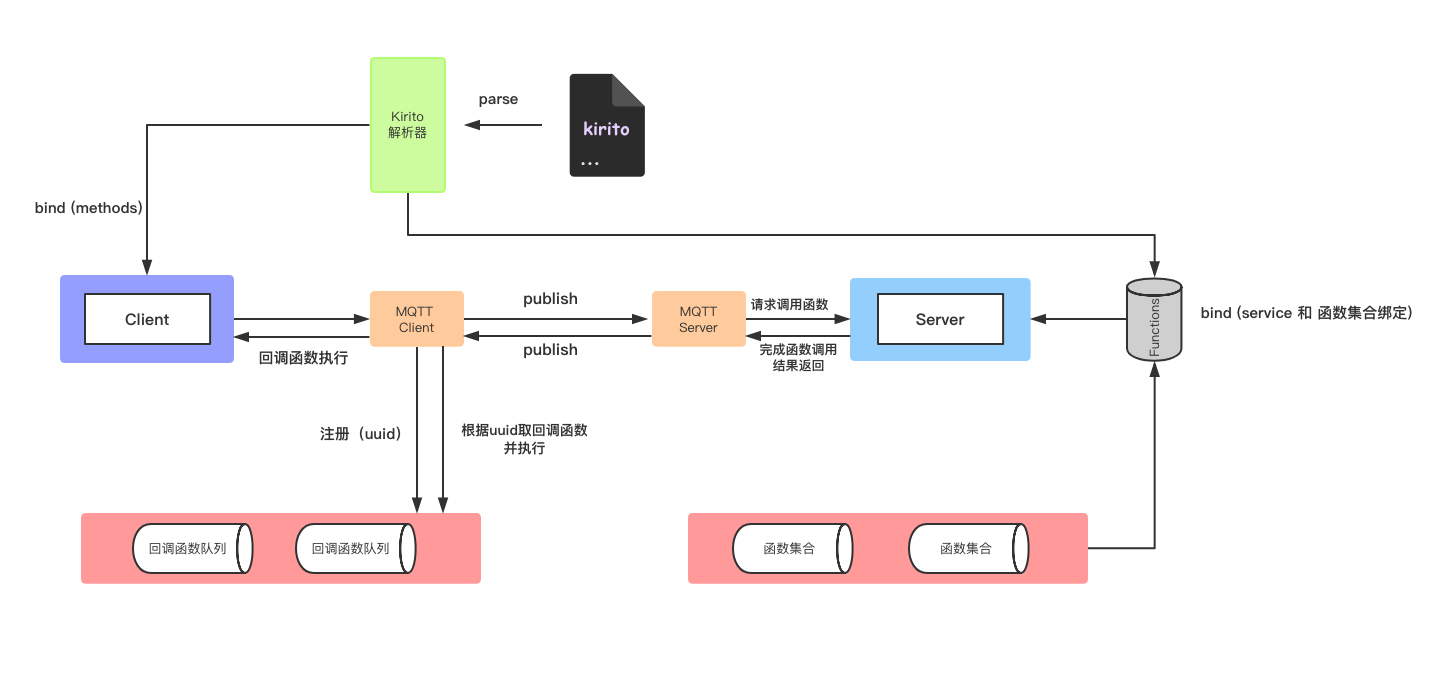
调用流程总结:
- client端解析kirito文件,绑定kirito的service到client对象
- server端解析kirito文件,将kiritod的service与调用函数绑定添加到server对象
- client端调用kirito service 里定义的函数,注册回调事件,发起MQTT请求
- server端接收MQTT请求,解析请求body,调用对应的函数执行完后向client端发起MQTT请求
- client端接收到MQTT请求后,解析body和error,并从回调事件队列里取出对应的回调函数并赋值执行
说完了调用流程,现在开始讲解具体的实现。
server:
1 | // protocol/mqtt.js |
定义protocol接口,加上这一层是为了以后的多协议,mqtt只是默认使用的协议:
1 | // protocol.js |
接下来是server端的暴露出去的接口:
1 | // index.js |
client:
1 | // protocol/mqtt.js |
定义protocol接口:
1 | // protocol.js |
最后是client端暴露的接口:
1 | ; |
就这样,一个简单的IDL+RPC框架就这样搭建完成了。这里只是描述RPC的原理和常用的调用方式,要想用在企业级的开发上,还得加上服务发现、注册,服务熔断,服务降级等,读者如果有兴趣可以在Github上fork下来或者提PR来改进这个框架,有什么问题也可以提Issue, 当然PR是最好的 : ) 。
仓库地址:
RPC: https://github.com/polixjs/polix-rpc


如果长时间无法加载,请针对 disq.us | disquscdn.com | disqus.com 启用代理